
When I started designing websites almost two decades ago, there was no WordPress and there was no blogging. I think my earliest actual online blog was pretty much on GeoCities. Do you remember that platform? It seems like ages ago, maybe because it has been.
In order to establish an online presence, you needed a handful of images for a small business or solopreneur website.
You’d usually either hire a photographer to do a shoot or bought stock photos to use on the site… and then you were done! That’s not the case today… at all.
In order to keep your web places fresh, you must update them constantly with original and curated content, and the web is more visual than it’s ever been. This presents a challenge because you need lots of visual content to complement, beautify, and break up your written content.

Adding a relevant image to each one of your blog posts is worth the time, effort, and money because you can increase the likelihood that your post will be found, read, and shared.
A picture is worth 1,000 words and it has the power to attract and hold our reader’s attention and make our posts memorable.
If the difference between a post that looks juicy and compelling versus a post that looks uninteresting and uninviting lies in a picture, would you be willing to add one?
It does require a little more time, effort, and sometimes money, but it is worth it. I know as my images have started to look better, my posts have performed accordingly.
This is what Jeff Bullas revealed:
- Blog posts with images get 94% more total views. Ah, yes, please!
- 60% of consumers are more likely to consider or contact a local business when an image shows up in the search results
- In an online store, customers think that the quality of a product’s image is more important than product-specific information (63%), a long description (54%), and ratings and reviews (53%)
I don’t think you need a lot of convincing, so we won’t spend a lot of time doing that. You know images are important and want to do it. However, I want to make sure you know that there’s a lot to learn and get acquainted with before using images on your site.
Best Practices For Using Images On Your Blog Posts
Choose an image that is relevant to the blog post’s subject matter and represents the concept you wish to communicate. Your image must tell the story or tell the reader what the story is about.
There are many ways to “get pictures for your blog” and the best one is to take them or create them yourself. Alternatively, you can use public domain sites (like Wikimedia Commons) or Creative Commons (like Flickr images).
Whatever you do, for the love of blogging, avoid Google Image Search – most of the images on your results will be copyrighted and not fair use.
You don’t need to take my word for it; this is how Google explains it:
“The images displayed in a Google Image Search may be protected by copyright, so we can’t grant you the right to use them for any purpose other than viewing them on the web. If you’d like to use images from our image search, we suggest contacting the site’s webmaster to obtain permission.”
Clear as daylight. You may think that “viewing them” is not at all helpful, but I beg to differ. I actually do image searches to see what comes up for a particular post title, keyword, or key phrase and I come away with ideas on what images I could take or create myself that would be a good fit.
So back to how serious copyright is, read this post by a fellow author and blogger in which she tells her story:
“… it was a lot of stress, lawyers had to get involved, and I had to pay money that I didn’t have for a use of a photo I didn’t need.” ~ Roni Loren
Knowing that real people go through legal battles over a photo makes things a bit more real, and teaches us what we all need to know about fair use.
I’m not a lawyer or intellectual property professional, and if you aren’t either, it’s safest to assume everything on the web is protected by copyright. And even when you take a picture of something or someone else, you could still get in legal trouble, because sometimes you’ll need a waiver.
And when it comes to “Royalty-Free” or “Copyright-Free,” educate yourself on the terms of use, read the fine print, and follow the rules as your life depends on it. If it’s not clear how to give credit for a picture you don’t own, stay away from it or seek the advice of an expert in this aspect of the law.
If you use a photo that you didn’t take, purchase, draw, and have no strict permission to use, EVERYTHING you claim as a reason will be considered an excuse.
When I use the term image, I am not referring to a single personal photo. You can spice up your blog post by adding an infographic, a chart, a hand-drawn illustration, a graph, a diagram, a screenshot, a collage, etc.
No matter the type, make sure you choose a high-quality image. If you take your own pictures, that means investing in a DSLR (Aff Link).
There are free and low-cost online photo editing tools like Pixlr, Pic Monkey, or Gimp you can use to make small edits like re-size or crop your image. I recommend using a watermark on each of your pictures. I use my logo and my web URL on all my images for branding purposes.
I use Canva to search for and purchase pictures, elements, and layouts. It is easy to use, production time is low, and has so many done-for-you templates for blog and social media platforms that are either free or $1 to use. I’m so in love with this tool! I feel it allows me to be creative and add touches and edits to images in just a few minutes which makes a huge difference.
There is no rule as to how many images you must add to a single post, but I think it’s good to maintain a good balance. I tend to be a lengthy writer, and I notice that the more pictures I include, the better formatted my post will look.
When I only use one picture, I usually keep it toward the top to make the post more interesting, compelling, and engaging.
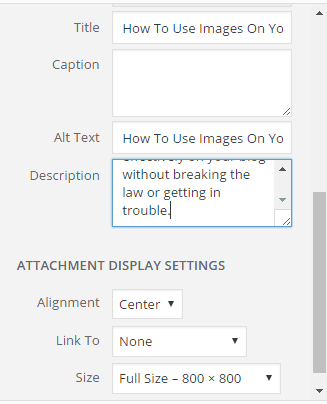
Taking advantage of the ALT text, title, and description for SEO
Because Search Engines (spiders, crawlers) don’t read images – only text – when you save (or rename) your images, using your target keyword and key phrases in the file name, separated by dashes.
You can rename them to make sure they meet these specs so they can be indexed properly by Google and Bing. In other words, my picture for this post is named “how-to-use-images-on-your-blog,” instead of IMG_0007 or DSC_2016.
After you upload your image to WordPress, you will write the keyword-rich name you selected in the title, ALT, and description fields, too. When I don’t add a caption on top of the actual graphic, I fill in the caption field as well, because it is a best practice to add a bit of explanation to clarify the visual. People like captions.
As far as the LINK field of your image, if you are working with a brand or affiliate, you may link to them by using the custom URL option. Keep in mind that adding a hyperlink will most likely disable the sharing options you want to have on the picture to encourage your readers to spread the word.
Oh, and let me warn you: avoid linking back to the web place where images are hosted (hotlinking), and instead, just host them on your server (your WordPress media gallery).
Pictures are wonderful to convey a message, but remember to use a good balance of text and images, and to be consistent in your images. As you can notice on my blog posts, I tend to use full-width pictures, center aligned, and with lots of purple and turquoise accents.
Find what works for you and conveys your brand personality, and do that as much as it makes sense to enhance and enrich your blog post content.
What do you think is most important when it comes to adding pictures to a blog post or website? Share your expertise below!
Founder of the Positive MOM® and creator of the S.T.O.R.Y. System: a blueprint to craft and share powerful stories that will transform your results and help others do the same. Dr. Elayna Fernández is a single mom of 4, an award-winning Storyteller, Story Strategist, and Student of Pain. She’s a bestselling author, internationally acclaimed keynote speaker, and 5x TEDx speaker. She has spoken at the United Nations, received the President’s Volunteer Lifetime Achievement Award, and was selected as one of the Top Impactful Leaders and a Woman of Influence by SUCCESS Magazine. Connect with Elayna at thepositivemom.com/ef and follow @thepositivemom. To receive a gift from Elayna, click HERE.

Want to support the Positive MOM blog?
The mission of the Positive MOM blog is to help moms break trauma cycles, find peace, and feel emotionally whole, so they can practice supportive parenting and create a positive and healthy environment for their children. If you found Elayna’s content valuable, please consider donating a love offering to enable her to keep creating content and helping more moms worldwide. Donate HERE.
Learn 21 Ways To Skyrocket Your Blogging Success
Saturday 4th of July 2020
[…] having your own logo, tagline, and colors, you can use images to reinforce the message and essence of your brand in each […]
Yeimi Santana
Wednesday 13th of September 2017
This is a very helpful post. I agree, images make a huge difference in the way we feel attracted or not to read a post. You shared vauable information to take into consideration when writing a blog post. Thank you!
Dania Santana
Thursday 27th of July 2017
Thanks for all of the great info! I have to get better at adding descriptions to my images because it is really worth the effort.
sepiaads
Saturday 1st of April 2017
Thanks for the head up! Will keep this in mind!
RC
Tuesday 30th of August 2016
This is a very informative post. I didn't know you should fill in the title and alt text for SEO. I would just write a caption and that's it. Thank you for this.